Showing posts with label XP. Show all posts

9.17.2009

Zune 4.0 Software Overview

Seeing as I do not really use windows or have a Zune, none the less Zune 4.0, I decided it would be best to use this post by a friend of mine as he seems to have done a pretty good job on covering some of the new features in Zune 4.0. Once again, thanks RoboticSpartan!


“Okay. So I have been so pleased with the new Zune software that I have decided to write a overview of it. This will basically be a look at the new features in 4.0. So far I have been very pleased. This software coincides with the release of the new Zune HD. Alright so here we go.


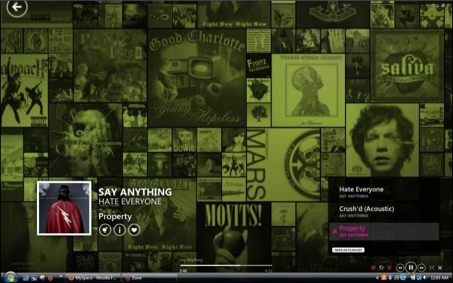
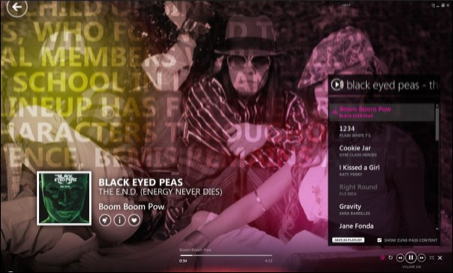
First thing we notice is that the Now Playing screen has had a complete overhaul. It is by far the coolest thing I have ever seen in a music player.

9034_177450459408_825554408_3592760_7484291_n.v8KgQU2DMHLa.jpg


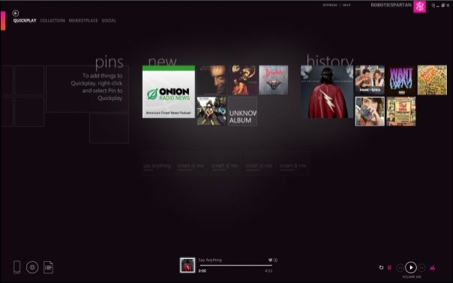
The next thing we see is that there is a new home screen called Quickplay in the navigation area. It features recently played, new additions, marked quickplay songs.

9034_177450949408_825554408_3592762_7469963_n.2mF5Z5c7dpki.jpg


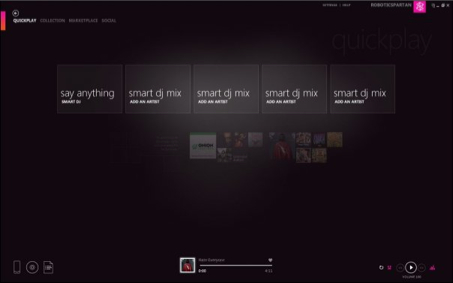
Also on the quickplay screen is the new Smart DJ feature. It's somewhat a clone of Genius which is found in iTunes 8 and later. However the Smart DJ uses user preferences, likes (Much in the same vein as Facebook 'Likes'), takes into account songs played often, looks at songs that are closely related to the song picked as the base. It builds an infinite playlist of songs from you collection and (If you have a Zune Pass) songs from the Zune Marketplace. It works extremely smoothly and is very effective at choosing accurately relevant songs to add to the playlist.
9034_177451724408_825554408_3592774_5617832_n.8cFbv9K2XmEv.jpg

9034_177451919408_825554408_3592775_6649025_n.dyrscVTat1AO.jpg


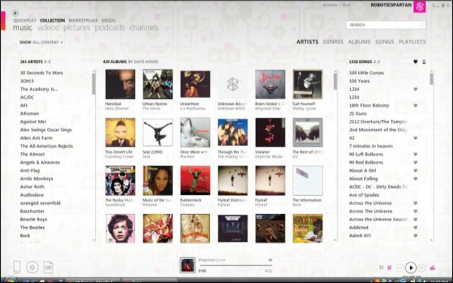
Next we see the library. Nothing particularly different about this piece other than new fonts and new buttons. The playback line at the bottom is somewhat different. When touched it uses a marker instead of simply pushing where you want to go in the song. Again nothing particularly different.

9034_177452774408_825554408_3592777_3793360_n.kIUcz2v7y3Oc.jpg


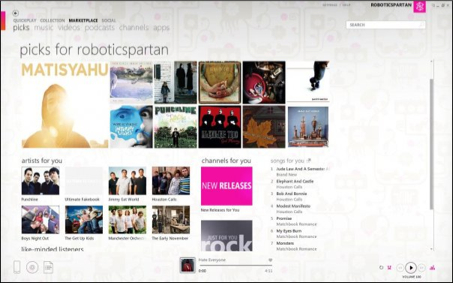
Looking into the marketplace for the first time while writing this overview I noticed some interesting changes. First of all if you opt-in for the Smart DJ feature it allows a new feature. It's called My Picks. This is where the Zune software picks out songs from the Marketplace that would be good for your musical tastes as appropriated by your ratings in your own library. This is also where the Smart DJ pulls songs for playlists if you have a Zune Pass.

9034_177453354408_825554408_3592778_2869331_n.HOMxaSeD89kF.jpg


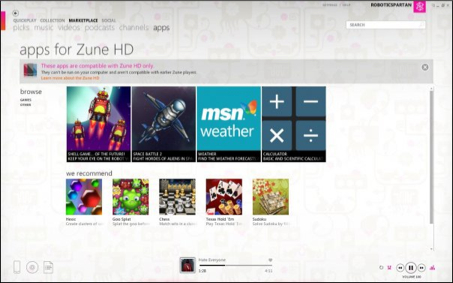
Next that's new and (Unfortunately) exclusive for the Zune HD is a Application marketplace very similar to that of Apple's iTunes App store. Not being a Zune HD owner but rather a 120 GB owner I do not know how well the Apps work or even the cost. With the understanding that this is brand new to Zune owners it is very unfortunate that the Application Marketplace doesn't live up to Apple's iPhone and iPod Touch Applications.

9034_177454674408_825554408_3592782_6588577_n.ctmuSq7mUl4l.jpg


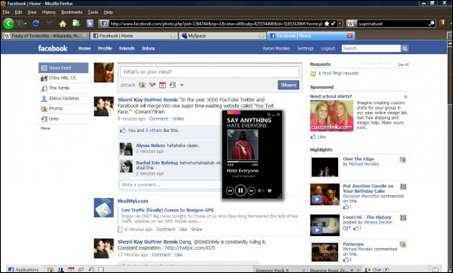
Another new feature (also something that iTunes has had for a while) is the mini-player. It's very useful if you don't want to keep switching back and forth between windows to see what the next song on your list is. It's also very useful because it sticks on top of the window your currently in and stays there until you move it or maximize the screen. It shows the album, song, artist, picture of artist as a visual, and a small list of upcoming songs. It's a invaluable tool. Not very innovative but extremely needed.

9034_177454484408_825554408_3592780_5007498_n.J3205U43REJX.jpg


The final new feature which is something that is exclusive to iTunes on PC's is the taskbar player. Windows Media Player also has something that is extremely similar. Basically it's a mini-mini-player that stays in the taskbar at the bottom of your screen. Very useful if you don't have audio controls on your laptop or desktop computer. If you scroll over it it expands slightly into the mini-player. If you drag the mini-player into the task bar it will become the mini-mini-player adding to the software's user-friendliness.


9034_177456024408_825554408_3592788_6724467_n.YiYmBaOozffp.jpg


Overall the software is a huge improvement over the old 3.0 software and has achieved a position that has placed it on the same level as iTunes. It is the PC equivalent to iTunes on a Mac. The Smart DJ was a extremely good addition and I am pleased with everything 4.0 has to offer.”

Read More...

7.06.2009

Enable Tethering on iPhone 3G or 3GS

If you are interested in enabling tethering on your iPhone 3G or 3GS, there is an relatively easy fix for you.


To begin, download the following file: ATT_US.ipccIf you are having trouble with the link, copy and paste the following address into your web browsers address bar: http://rapidshare.com/files/257360515/ATT_US.ipcc.


1. Open iTunes, plug in your iPhone and wait for iTunes to find it.


2. If you are on Mac, hold down the while clicking Check for Update. If you are on Windows, hold down the Shift key while clicking Check for Update. If you were able to select the downloaded file (ATT_US.ipcc) you can skip to step 3.


If you were not able to click on the file, quit iTunes and then do one of the following depending on if you are using Mac or Windows:

Mac: Open Terminal (Applications >Utilities) and type the following that is below:

defaults write com.apple.iTunes carrier-testing -bool TRUE

Windows: Click Start >Run, and now type cmd. Type the following two commands, one at a time exactly as it is below (be sure to include the quotation marks):

cd “c:\Program Files\iTunes”

iTunes.exe /setPrefInt carrier-testing 1

After typing the commands you can now close and/or quit Terminal or Command Prompt; and now reopen iTunes and try step 2 again. If it works, you typed every correctly and can now continue to step 3. If not, please leave a comment asking for help.


3. In the dialogue that pops up select the file you just downloaded (ATT_US.ipcc). It will only take a minute, but you should see a progress bar box come up for a few seconds. Your iPhone might now even look like it did anything.


4. To Check if it was successful, take a look at your iPhone...On your iPhone, go to: Settings >General >Network. You now should see two new options, Cellular Data Network, as well as Internet Tethering.


5. Power your iPhone off and on to make all the settings take effect.

Read More...

12.30.2008

Admin Your Router

If you have never logged into your router or configured it, try typing in 192.168.1.1 or 10.0.0.1 in your browsers address bar and use admin, password or 1234 as your password, and either use admin as your username, or just leave the username field blank. If that does not work then refer to your users manual or find your router's default password using Router Passwords or Default Router Passwords. If all else fails you can always search Google for the username/password for your router. If you are using a Time Capsule, the username/password may be pre-programed to each Time Capsule.


(Image Courtesy of AppleInsider.com)

Read More...

10.18.2008

Playlist Folders

The other day I told you about creating and using smart playlist to sync only what you want to your iPhone or iPod when you have limited space. If you found that useful, and have a lot of playlist, you may want to consider putting some of them in a folder.

Open iTunes and go to File> New Playlist Folder. Then just drag the playlist you want into that folder. If you want to remove a playlist from a folder, just drag and drop it out of the folder on the the word "Playlist".

Read More...

10.17.2008

MP3 Tunes (Music Locker)

Privately owned site, mp3tunes.com has an amazing set of features that will keep your tunes in sync, and allow you to listen and share them just about anywhere. You can sync upload your library to back it up, or download and restore after a computer crash. The site offers a variety of devices that you can use to hear your music...


One other popular feature is sideload. This free service allows you to easily browse and search for popular music. You can download the tracks, add them to your phone, or add them to your mp3tunes locker. If you upgrade to a premium account you will gain more space which you can put toward syncing your music library.

My favorite product that goes along with this service has to be the Logitech radio. It can stream any tracks in your mp3tunes locker right to your Logitech Squeezebox. All you need is Wi-Fi. You can control this playback just as you would a regular CD. The only major difference is that you will be able to see the information on the song that is playing such as the title/artist/album.

Read More...

10.15.2008

iTunes: Smart Playlist

Considering the fact that all my music, let alone, my whole iTunes library does not fit on my iPhone, I had to create a way to always have the music that I like the most. The solution was smart playlist. This way I never have to mess with anything more than once, and will always have a consistent library that updates based on what I like the most. With an exception to one playlist which is designated for my iPhone for the songs that for whatever reason don't fall under any of my smart playlist; or for the ones I know I want on my iPhone.

To create a smart playlist open iTunes and go to File> New Smart Playlist... or just press ⌘-⇧-N (Command-Shift-N).


Once you create a smart playlist you can then add rules. Rules are simply just filters to make the playlist get what you want, and only what you want. Below are 5 different examples you can use to get you started.


Brand New


Mobile Mix


This Week


Ratings


Recent


Top 100

Read More...

10.07.2008

Safari Activity Window

If you use Safari, you may be wishing that you would have know this trick much sooner. In the Window menu, you can click on Activity and view all activity that has occurred or is in process for any of your open Safari windows.


I have noticed that Safari for Windows does exclude certain items in this list, but if you are using Safari for Mac, then you get to see everything, and can just doubl click on any item to instantly download it.

Read More...

9.19.2008

Free Quicktime Pro Features and Other Powertools

German site, monkeyBread Software has many free downloads (donation-ware) that offer some of the extra features you get when you buy Quicktime Pro, as well as other great utilities and power-tools. While most of the software is for Mac, there is quite a bit of it out there for Windows as well. One of the best is the Full Screen Movie Player for Quicktime Movies. While the website has some great Quicktime extras, they also have some other power-tools that should have been included in Windows and Mac. My favorite from them is theTreeSizefile listing program.

Read More...

9.16.2008

iTunes 8 Finally Fixes App Update Issues

Back in iTunes 7, all the way back a whole 5 days or so, iTunes would not delete the old versions of an app when you downloaded an update, the new update would just assume a new name such as "Remote2.ipa" or something like that. Now in iTunes 8 the problem is fixed and old versions of the app are automatically moved to the trash/recycle bin.

Read More...

1.05.2008

Disguise Your Browser

Access websites you are blocked from due to your browser. One of the most annoying things to me is the way that Microsoft has made Office Live and some other pages of their website only accessible to Internet Explorer users. I do have internet explorer, but it loads way slower than Safari or Firefox. The solution to this is to disguise your browser. Mozilla Firefox add-on User Switch Agent allows you to do just that. Simply install the addon and add the button to your toolbar for easy access. I have found that Office Live will now load in and work in Firefox, but is still very error filled in Firefox. If you need a list of possible browser types you can see a list here.

Read More...

12.24.2007

Microsoft Office Live Photo Galleries Using Ringo

I know that many people hare going to be taking a lot of pictures in the next day or so, so I made this video to help some people with creating a web gallery for friends. In this episode of my podcast I show how to link to this web gallery using Microsoft Office Live, but you can also link to gallery in something like your email or blog. There is also a PDF file available for additional help. To view the video either have to download it or you can just subscribe to my feed in the reader of your choice or using iTunes.

Read More...

12.09.2007

Quick Image Editing: FastStone

As much as I enjoy all of the features of Photoshop, it is a little slow on my laptop, and lacks some of the features I have in Lightroom such as flash gallery creation, although from what I have seen of CS3, this feature has been implemented. One way to get around this little annoyance is by using software by FastStone. This software is very light and just as powerful when it comes down to the basics of editing and creation. It is also much easier for some of us who struggle to find what we are looking for in the Photoshop menu as we attempt something new. FastStone offers 2 programs that can be used to edit photos. One can edit images in bulk and the other has extra features. Why would you want to edit in bulk? Simply because it is way easier to automate watermarks or resizing in bulk rather than one at a time.


FastStone File Size Resizer: This is a great tool for bulk editing and for compressing pictures. Includes editing features such as cropping, changing the color, blur, sharpen, tags, format changes, color depth, markups, watermarks, and rotation.


FastStone Image Viewer: This multi purpose program is lite yet feature loaded, my favorite features include the creation of single file, executable slideshows with the ability to browse the files contained inside. What is great about this is that between this and autorun pro, you can easily create a photo disk to give to someone and make the slideshow start automatically. I personally use this method for those who I am giving a photo disk and know they will need help viewing a slideshow of the pictures. The other cool thing about this is that you can choose what EXIF data you want to be displayed and also add some music for your presentation. Finally this also create thumbnail pages of your pictures in a single TIFF or PDF and edit your pictures with features of File Size Resizer as well as creation of new images such as b y the integrated screenshot feature, but cannot batch edit/resize.

Read More...

12.04.2007

Offline Webpages for iPhones or Anything With Bookmarks In 4 Steps

As wonderful and feature loaded as an iPhone running third-party apps is, it is not very useful when it comes to reading saved web pages. Which is why I have come to the fact which I must then use URIs. A URI contains all the HTML code of a page in the address it self. They are also know as "Data URLs"

Here is how to create one:

If you don't already have the source code of the page then here is how you can get it. As far as I can remember you can't get the page source on Internet Explorer, so just go ahead and use Safari or Firefox, and once you do, just go the the web page you would like to make mobile, and right click and view source, or go to your View menu on either Firefox or Safari and click "Page Source" (Firefox) or "View Source" (Safari). Select and copy everything on the page.

If you are like most people, you either don't know how to get that web page into one simple/short URL then go on over to URI Kitchen, and have it do the work for you.

Paste the code, and then click the Generate button at the bottom of the page. It should take you to a page with a link. This is your new URI! However you choose, make the link it gives you a bookmark on whatever it is you want to read the offline page on.

The easiest way to get it to an iPhone is to save it as a bookmark and sync it to your iPhone using Safari. If you sync with Internet Explorer, right click on the URI that was created and copy the link location, and then go into IE and create a new bookmark pasting the URI's link you just coppied the the bookmarks destination field.

Sync, and check to see if the page displays right if you have not already done so.

Read More...

11.11.2007

Restore Your iPhone to Working Order and Without Loosing Personal Information In 4 Easy Steps

If you ever use any third party applications you may encounter a problem down the road that may just cause you to be "locked out of your iPhone" or "stuck in a loop of rebooting". If you were like me, and you used the AppTapp installer to install stuff from the iPhone itself then it may have been a while since your last sync and backup from iTunes. Here is what to do to restore your iPhone to working order and restore all of your information.


1. Open iTunes; go to Edit>Preferences>iPhone (Edit>Preferences>Syncing for iTunes 7.5)
Choose "Reset Sync History", and then click OK.

2. Plug in your iPhone and in the Summary tab click"Restore". After clicking you may be prompted to create a backup. Even if you already have a backup let iTunes create the backup to make sure it is up to date.

3. Continue with the restore, you may have to wait for iTunes to download the firmware it is going to install. This firmware will be the latest firmware available. Once this is done iTunes will take care of the rest.

4. Afterwards, your iPhone will once again appear in iTunes, when prompted to either or Restore to Backup, choose the Restore to Backup. Once again, the restore process will begin, but this time when it is done, sync your iPhone to get all your synced media back on to your iPhone. Once this is done you are ready to go!


FAQ:

How long does this take?
This generally takes about 15-25 minutes for the restore process itself but can take longer depending on how long it takes for iTunes to download the firmware for your iPhone if it is not already, and is completely safe and very easy.

My iPhone keeps resetting or disconnecting itself.
Most likely it means you will or already have gotten an error while attempting to restore. Just wait until iTunes displays your iPhone again and then start the process over, this time it will start immediately as the firmware is already downloaded. You won't have to worry about the iPhone restarting once the restore process has began as it puts the iPhone into what is know as "Safe Disk Mode". During this mode, no firmware is loaded, and your iPhone is basically a slave to iTunes.

What does "Reset Sync History" do?
All this does is makes it as if iTunes has not yet synced with your iPhone. Use this when you have changed computers and have not yet synced personal information such as that as described above. Otherwise your iPhone may loose some information that is missing from your computer but on your iPhone such as contacts created on your iPhone. In other words this tells your computer not to erase anything from your iPhone because its not in the computer yet. Whenever possible always choose Merge so you can choose what information you want rather than replacing the wrong thing or getting duplicates of everything.

What does a backup contain?
A backup only backs up your personal information such as Calendar, Contacts, Notes, Preferences, Mail, Safari Bookmarks, History, and Cookies, and suprissingly, Pictures you took on your iPhone. Just to be safe always copy your pictures to your computer beforehand. If you have any third party applications they will be lost, but can be reinstalled later.

What is not backed up?
Songs, Music, Video, Podcast, Audiobooks...this will all be restored to you iPhone when you Sync.

What happens when I am done doing this?
Once your have completed all 4 steps, you can start using your iPhone and everything will be right where you left off. The only difference is that you will be missing the third party applications.

Read More...

10.12.2007

Virtually Install any Operating System and Run It Natively

One tip for installing any second (2nd) third (3rd)...operating system, Virtually install them and then run them natively without going through a native install using WMWorkstation.

This is acually a very easy way to install virtually any operating system to your physical hard drive while you are running your current operating system. For some operating systems such as Windows, you can easily choose to install your OS with a GUI (Graphical User Interface). For others such as Linux you must restart your computer and boot with the CD or DVD inside. For those who are not very comfortable with doing this and fear they might install to the wrong hard drive or partition and erase the wrong stuff I would try this alternative I discovered. What is even better is that you can always go back and use VMWare to access files from the new OS, while you are using the old OS.


READ EVERYTHING BEFORE STARTING


If you don't have or plan on buying VMWare Workstation just dowload the trial. You can actually just download the trial and set up your OS as the trial is full featured, but time limited.


How To:
  • File>New>Virtual Machine>
  • Custom
  • Hardware Compatibility Workstation6 (Or the newest version that is listed.)
  • Choose the type of OS you will be installing.
  • Name the virtual machine anything you would like. Save it on the same drive or partition you are currently using for your primary OS, or the OS you will be using when you install the new OS.
  • Most likely wou will want to choose One Processor so your computer will not give to much processing power to the VM. (the option for two processors is only made available when you have either a Dual-Core Processor, or a Dual Processor).
  • Choose the amount of memory you would like your VM to use. I used just over half of what I had in my physical memory.
  • Use Bridged Networking
  • Use Bus Logic
  • Use a Physical Disk
  • Very carefully choose which hard drive and partition you would like to install the new OS to.
  • Name and, make sure the .vkmd Disk Descriptor File is stored in the same place as your Virtual Machine Settings (by default it is stored in the same place). Note where it is stored, you will need to edit those files in just a minute.
  • Then press CTRL+D>Under Floppy uncheck the Connect at power on box.> Click Okay, and then close VMWare. Here is the hard part, you are going to need to right click>open with>notepad.


Locate the .VMX file for this VM and remove:
scsi0.present = "TRUE"
scsi0.virtualDev = "lsilogic"
scsi0:0.present = "TRUE"
scsi0:0.fileName = "FreeBSD.vmdk"
scsi0:0.deviceType = "rawDisk"
Add the following lines:
scsi0.present = "FALSE"
ide0:0.present = "TRUE"
ide0:0.fileName = "FreeBSD.vmdk"
ide0:0.redo = ""
ide0:0.mode = "independent-persistent"
Replace "FreeBSD.vmdk with the name of your .vkmd Disk descriptor file.

Now open the .vkmd file and change:
ddb.adapterType = "lsilogic"
to ddb.adapterType = "ide"

Save, close and now open VMWare, and put begin the installation. Once you are done, you can close VMWare and natively boot into your new OS as if it were installed natively.

If possible, when you are installing that extra OS, save the new boot entry to the hard drive which the operating system is being installed on rather than to the MBR (Master Boot Record) as you will most likely will able to configure your dual boot using EasyBCD in the current OS rather than having to mess with the new boot screen. This is how I avoided GRUB. You will want to add the boot entries for you new OS before you install, add entries for all the places you think the OS may be installed. This is a great way to test to see where everything is installed, and it also ensures you will be able to access everything without any worries.


Troubleshooting:

Drivers
What is great is that VMWare will run any OS even if some hardware drivers are missing becasue you can choose which hardware to include. In my case, I installed Ubuntu only to find it would not boot on my notebook because I did not have the bcm43xx wireless drivers. What I did is went into VMWare and installed the drivers as I had no wireless card in VMWare, just a virtual ethernet connection that was bridged to my real connection.

Install Location
The other problem I ran into was that once I try to natively boot linux, it was searching for an install on disk 0, not disk 1. I just had to go into Ubuntu from VMWare and change this and everything was okay. The alternative is to edit your boot entry during the boot process by pressing eand then changing the install location to the appropriate place. I think linux is the only type of OS that has this problem. Windows and OS X86 worked fine for me without having to change the install location.

Read More...

Auto Run Any Type of File

If you have ever wanted to create a CD or DVD for someone who has trouble with computers, the best thing you can do is create a cd that will autorun the file you want them to see. AutorunPro.exe makes this free and simple!

Download AutorunPro.exe. Once you extract the files you make sure the icon, AutorunPro.exe file, the autorun.inf, and the file you wish to autorun are all going to be placed in the root director of the disk you wish to autorun.
First create a new autorun, .inf file. To do this you can create a new text document; copy and paste the following into the file:
[autorun]
open=AutorunPro.exe /s
icon=Icon Name.ico
[AutorunPro]
Run1=Web Page.html
The "/s" keeps the tiny splash screen from the .exe file from showing. Change Webpage.html to the name of the file, and if you want, change the icon by replacing Icon Name.ico with your own icon. You can also autorun multiple fules by adding more lines such as in the following:
[autorun]
open=AutorunPro.exe /s
icon=Icon Name.ico
[AutorunPro]
Run1=Web Page.html
Run2=Video.mpg

Read More...

Cairo Shell

This is something I look foward to seeing. The explorer in Vista is one of the few minor improvements, but this by far will be a replacement for Windows Explore if this works the way it looks in the picture. I really like the whole "coverflow" thing. CairoShell's Cairo vs. Leopards Finder. I hope this turns both as good as it looks, and free.

Read More...

10.11.2007

Long Wait....

Read More...

9.16.2007

Video/Screensaver Wallpaper

Dave Vronay from Microsoft’s UX team created a very small program called Animated Desktop which allows Windows users to run a screensaver and use it use it as their wallpaper. The problem is that it covers up your actual desktop. The solution is to either create a toolbar by dragging your desktop folder to the taskbar (For XP this is usually found in C:\Documents and Settings\User Name and Vista users can find it in C:\Users\User Name) or to use something like Object Dock or RK Launcher. The best part about this is that it is completely free and will only use as much memory as the screensaver takes. I would recomend using RK Luancher as it is much lighter in memory and works just as well and soon to be better. If you have the tools try creating your own video screensaver with or without sound, its your choice really, just know that Animated Desktop plays everything in the screensaver including sound, oh and the screensaver settings must be changed in the Windows screensaver options. If you do choose RK Laucher there is RKLauncher 0.41 for XP and RKLauncher 0.41 for Vista that come with an installer.

Read More...

Safari 3 Fast Clean and Powerful

After using Safari 3 for sometime now, I must agree that it is indeed "The world's best browser". It is simple, powerful and very fast. Even though it is still in beta it is very stable and at this point better than Firefox without any add-ons. Safari opens very quickly and loads pages just as fast. You can save things easily and change the default save directory as well. Managing bookmarks is now a very clean process. You don't have to install any additional plugins or toolbars for anything such as Google Toolbar as Safari installs your Adobe, Real, WMP, iTunes, Quicktime and Flash plugins during the browser install, along with the fact that it comes with a Google/Yahoo search box.

One feature that I will only use in Safari and no other browser is auto complete. Safari is the first browser that I have ever used that is almost always right as to what I want. What I really hate about most browsers is that the rest of the word starts coming up right away, with Safari it will not just choose the first on the list, but actually see what was most recently typed and then go from there. The other thing is that it allows you to keep typing your own word even after you have selected an auto complete word or set of words, meaning it places the rest of the word/phrase there but allows you to type something else without having to go back and change the word to the way you want it after it has put in the auto complete.

My other favorite feature is the way that it autofills forms. You can put in your information such as address, email, and phone into Safari so it can autofill the page when it detects such fields. What I like about this much better than Firefox is that when it comes to saved passwords others who are using the computer may not necessarily know that you have a saved password for the website. In Firefox, if you are at a site you have a saved passsword at it will almost always have your screename/password already in the box; if not you just start typing your screename and tab into the password box for it to fill your password, which lets others know you have a saved password. In Safari if you type your screename and tab into the password box the password is not automatically filled in. It may auto complete your screename but that is about it. The secret is that if you have a website with multiple names and users stored it you just type in your screename and then press the AutoFill button to insert the password. Meaning you can save different usernames and passwords without others knowing it by turning off auto complete so you have to enter the correct screename in order for the AutoFill button to even do anything. If your computer is only used by one person, just leave it on and press the AutoFill button when you get to a page you want Safari to fill in. 


Finally, there is the find feature. Firefox is much better than IE as it searches while you type and can highlight what it finds. This sometimes does not make it any easier to see what it has found. In Safari the rest of the page is shaded darker and there is a bright orange box that shows what is found and currently highlighted, and the other items that are found are not shaded. Other than that Safari offer users the ability to stretch small text boxes knows when to paste what as you just have one option "Copy Link", and it knows when to paste only the URL, or the whole link with title and all. 

Read More...